Home > Help & Advice > Installation > How do you use cat5 cable to wire a cctv system?
Using CAT5 cable to wire CCTV cameras
In recent years the invention of the video balun has meant CAT5e cable can be used to connect CCTV cameras to CCTV DVR recorders. All the connections can be made using only a screwdriver, with no need for special tools or fiddly components. Before you start there are a couple of important things to know.
What components do I need?
Video is transmitted along the CAT5e cable using a pair of video baluns, one at the DVR end, and one at the camera end. We sell 2 types of video baluns, Standard definition and High definition designed to be used with our HD 1080P cameras and DVR recorders. Power is transmitted using screw-in DC plugs and sockets. The plug goes at the camera end and the socket at the DVR end. Locate the camera power supply close to the DVR.
Use the correct type of CAT5e cable
You must use pure copper CAT5 cable. Some CAT5 cable is not pure copper but CCA or copper-coated aluminium. Don't rely on the label or what the retailer says, actually check the cable yourself. CAT5, CAT5e, CAT6 and CAT6e can all be CCA rather than pure copper. CCA tends to break easily when bent and you can scrape the copper off to reveal silver-coloured metal in the centre. All the cable we sell is pure copper external grade.
Don't exceed the maximum cable run
The maximum distance video signal can be transferred with our video baluns is approximately 300 metres. If you are using the cable to power a camera as well as transfer video signal then we would suggest a maximum distance of about 50 metres to avoid voltage drop. This assumes you are using 3 pairs of wire for 12 volt supply and 1 pair for video signal transfer as per our images below.
Use a colour convention, stick to it and check carefully
It is important to check your wiring carefully. Choose a colour convention and stick to it. In the examples below we have used blue for the video signal and solid colour for +ve, white plus a coloured stripe for -ve.
You need to run 1 length of CAT5e cable from the DVR recorder to each camera. The cable is going to do 2 jobs. One pair of wires will handle the video signal, and the other 3 pairs of wires will be combined to take 12-volt power from the transformer located next to the DVR to the camera.
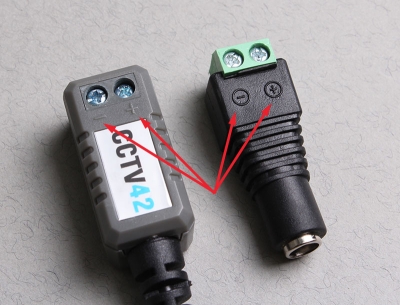
Firstly identify the polarity for all your connectors
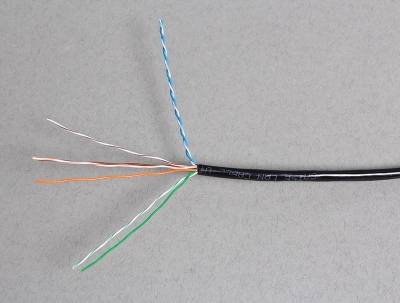
Separate the 4 pairs of wires in the Cat5e cable. In this case, we are going to use the blue pair for transferring the video signal from the camera to the DVR. Keep this pair twisted, to reduce the chance of interference.
The green, brown and orange pairs are going to be used to take 12-volt power from the transformer to the camera. We use 3 pairs of wires combined to reduce the risk of voltage drop at the camera. Having unwound the wire use the solid colour for 12-volt +ve and the white with coloured trace for 12-volt -ve.
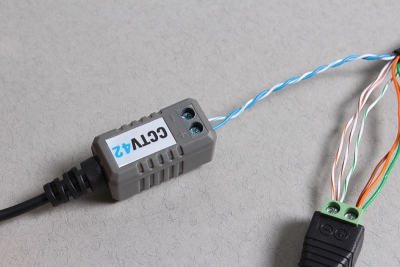
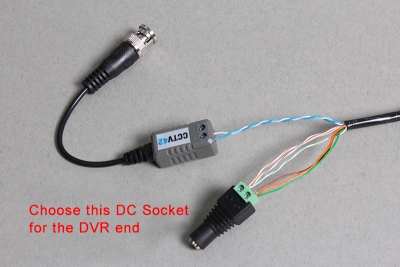
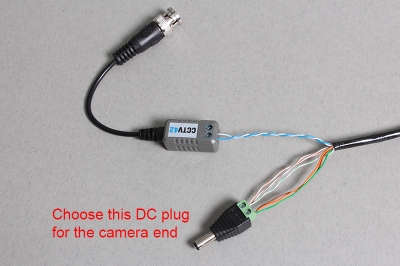
Here we can see the cables inserted into a video balun and a power plug.
Remember to strip back the outer plastic sheath to reveal the copper conductor before pushing into the fittings and tightening the connector with a small screwdriver.
Note how we have combined the 3 pairs of wires for the 12-volt DC fitting.
Be aware the DC power fittings are different for the DVR end of the cable and the camera end of the cable. The DVR end requires a female socket to take the 12-volt power from the power supply.
The camera end requires a male DC plug To take 12-volt power to the camera
It is important to protect the fittings from water so we recommend using weatherproof junction boxes for each camera. All the components you need are available in the CCTV accessories section of our online shop.

